How to put on your Aikido Hakama
How you put your Aikido Hakama on will slightly differ from person to person but there isn't a huge difference. Also, if there is a certain way you would like to tie it, then please go ahead and use that method.
-
Put your legs through and drape the front part over the knot of the Obi
Bring the string towards the front past the hips and overlap it over the place where you bought the front part of the Aikido Hakama over the Obi. Take the overlapped string and wrap it around your hip one more time and bring it forward. Make sure that the string does not twist around while this is happening. -
When it is brought to the front, put some tension on it and tie it in the same way as the Obi.
Any leftover string, you can put it through the previously wrapped string or you can leave it as is. -
Place the backplate over the Obi (over the hip) and bring the string to the front.
Once you put the string through, tie it below where you previously made a knot in the same way, and you are finished.
 1. Place the Aikido Hakama down with the back facing up.
 2. Put the centre creases together...
 3. Being careful not to disrupt the centrefold, flip over the Aikido Hakama.
 4. This is the Aikido Hakama flipped over with the front facing up.
 5. Fold either side towards the centre.
 6. Fold up about 1/3 of the way from the bottom...
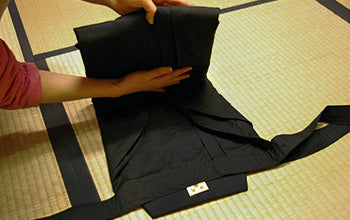 7. and fold again.
 8. Turn it over
 9. Fold the longer string in half
 10. Fold it another 1/3
 11. With both sides folded evenly, cross them over.
 12. Take the shorter string and take it to where the longer strings cross.
 13. Bring the short string over the long string like this
 14. Pull the shorter string under the crossing of the two long strings.
 15. Wrap it around once.
 16. Any leftover length of the short string, pull it through the bottom of merging point of the two longer string one more time
 17. and place it through the loop that was made with the short string that was wrapped around the long string initially.
 18. Do the same for both sides